


We start off back in 2008 with their first encounter. Both men have evolved and pushed their games forward in the intervening years, but this fight still showcases the basic strategies each brings to their stand-up game.
During that 2008 fight, it was Maynard who tended to fare better in the stand-up exchanges. His stand-up was (and, to a large degree, remains) based firmly on basic, solid execution of the fundamentals. It's not a flashy game, but it does everything very well. In particular, Maynard found a lot of success with straight shots up the middle. The right cross would often come right inside and connect squarely on Edgar. Maynard also was able to frequently get inside Edgar's defenses with a lunging uppercut that came under Edgar's arms and landed on the chin. When the two fighters were close, Maynard used textbook hooks to try and connect. Overall, his game was built on landing powerful shots that would stun Edgar, and it worked well. The one area of weakness would be kicks, as Maynard was almost 100% punching in the fight.
For Edgar, striking was not based on power but on speed. He used a lot of movement to connect. Edgar used angles to get inside and to land wide, looping hooks from the outside. He would also use movement defensively, moving his head and body well to slip incoming attacks. Edgar added speed to this movement, particularly in his combos where he would quickly string together a series of punches coming from a variety of angles. This work allowed Edgar to connect on Maynard, but seldom with the kind of power that truly leaves an impact in the eyes of judges. Add in a wrestling disadvantage, and Edgar was handed the loss on the scorecards.
Fight #2 at UFC 125 continued much of these same patterns, but is worth a closer look to see the exact techniques each man used.
Full breakdown of Edgar vs. Maynard 2, with gifs, after the break.

When talking about striking in Edgar vs. Maynard 2, there's really only one place you can begin, and that's round 1, and the Gray Maynard barrage that very nearly won him the title.
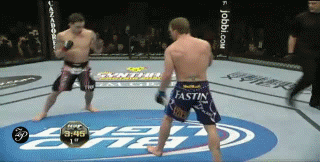
Gray begins the attack by stepping in with a left hook. Edgar is hurt, and Maynard decides to go for the kill, dropping his defenses and throwing everything at the champ. He hits some nice hooks while charging forward, but it's that right uppercut that really hurts Edgar. The champ goes down, and struggles back to his feet, only to be dropped again by an uppercut. There are a number of things to like about Maynard's work here, starting from the top.
First, on that initial punch, he takes a strong step in and throws immediately. He begins the sequence off to Edgar's side and not in a great punching position. With his hands down as well, he gives the impression that he's not a threat. But with that step towards Edgar and inside, he is immediately in punching range, and connects before Frankie can respond.
Second, notice how, even as Maynard charges forward, he still plants the feet to throw that last uppercut. He's on the move, chasing down the retreating champion, but before throwing the most powerful punch of the assault, he takes the needed time to square his feet and get the power behind him. The result is Edgar crumpling.
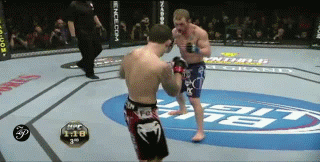
Finally, I love how he keeps his left hand on Edgar's neck as Edgar stands up. This gives Maynard a half clinch and lets him maintain control of Edgar's movement. He keeps his right hand free so that he can land more of those heavy uppercuts and drop the champ yet again. Rewatching it just reminds you what a miracle it is Edgar was not finished.

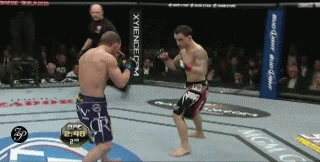
Later in the round, Maynard uses similar hooks and uppercuts to once again put Edgar in trouble. Though Edgar gets hurt badly again, he does manage to escape once again thanks to good movement. Here, Maynard tries to use that same clinch and dirty boxing, but Edgar backs out very quickly to avoid the shots. Edgar also is in full retreat mode here, but is doing so with good cage awareness, circling when he can to avoid backing straight into the cage. But he's also dazed and his hands are down, and Maynard does an excellent job taking advantage of that defensive hole to connect.
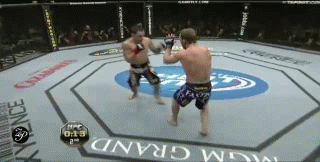
In round 2, we see almost a completely different Frankie Edgar, as the champion recovers, and begins using his own stand-up game to reclaim the advantage. Here is an excellent example of how Edgar uses movement so well. In this clip, he is constantly moving. But he always cuts right and left, never straight back. He also alternates right and left, keeping Maynard guessing and off rhythm. At one point, Maynard attempts to close the distance and drive Edgar back towards the cage - Edgar responds by firing out a quick jab that sends Maynard back. With Maynard moving in response to Frankie, and keeping his left hand a bit low, Frankie quickly steps in with a nice jab-cross combo that connects perfectly. There, it's the movement and accuracy that allows Edgar to connect.
As the round continues, Edgar goes back to that right cross, taking advantage of Maynard's low left hand to keep coming over the top and connect the cross. Here are two good examples from the end of the round. Notice how Edgar is now putting more behind that cross. On the first cross, he steps in with his rear leg as he throws in order to give himself more power. On the second, he twists his entire body, bringing the momentum of the punch up all the way from his foot through the body. Excellent technique there from Edgar.
In round 3 we see more of Maynard's striking. Here, he uses some nice hooks to connect. We also see how Maynard is able to come straight up the middle, this time with a left jab. This sequence is an example of the idea of Maynard's power vs. Edgar's speed. Maynard connects with the hook while Frankie's head is exposed because Edgar is throwing a combo. Both men connect, but because Maynard is throwing a single shot with greater power, Edgar is the one who is knocked off balance. Edgar recovers quickly, but Maynard keeps the pressure on with that jab. Here, the power shots are paying off again for Maynard, allowing him to trade shots with the smaller Edgar.
And finally, below is the ending sequence of the fight. This last minute really encapsulates everything that has come before, as all the techniques we've talked about are on display here: Maynard's single power shots, hooks, and jabs up the middle vs. Edgar's movement, speed, and combos. It's just a beautiful display from both men, and really, this minute of action does a better job than I ever could at explaining just why this weekend's fight is one to watch.

Don't forget to come back later today for K.J. Gould's Judo Chop Part 2 discussing Edgar and Maynard's grappling.
Gifs via Zombie Prophet of Iron Forges Iron.