C4
Guest

Alright, if you ever wanted to learn Match Previews then here is a very veryyy easy tutorial unless you don't know Adobe Photoshop.
To make Match Previews for your BTB's or to make simple banners for anything, you can use these 5 steps to make something good. :boxed2: You can even check out my Advanced Tutorial which will be posted sometime soon, it shows how to make Match Previews the pro way! Alright, let's start with our short and easy tutorial.
CHECKLIST:
1) Adobe Photoshop CS3/CS2 Recommended
2) Wrestler PSDS - Download from http://www.Italianpsd.net or http://www.psdprotocol.com
3) Good fonts - Download from www.1001freefonts.com
4) Good Brushes - Google "Photoshop *Version* Brushes Download"
5) A good creative mind, and Rep/ Thank you for C4 :shifty:
Ok, let's start with our tutorial. Open up Photoshop; I use Photoshop CS3 and it's the best version in my opinion although any will work above PS 7.
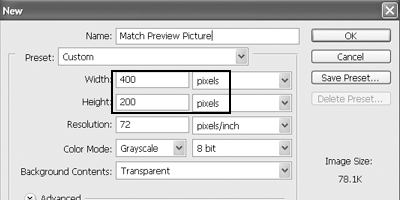
Now go to File > New and select the settings you want, C4's recommended size for a Match Preview is 400*200 pixels.


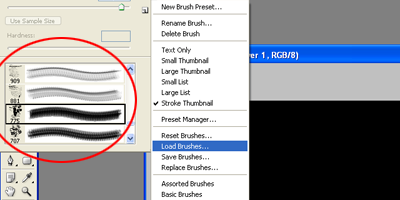
Once you have selected your desired settings, click OK. Select the brush tool and go to File>Load>LoadBrushes and select your brushes, the one's which you have downloaded. (PM if you need help with brushes) then make a simple background.

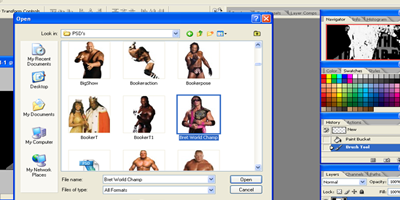
Open up the ".psd/.png" Wrestler picture which you downloaded earlier. I have a Folder in 'My Documents' with the name of "PSD's" where I save all of the pictures that I download.
Have something like that. Once you select your picture click OK. I selected Finlay and MVP for my Match Preview.

Too bigg huh?? Don't use 'Free Transform' or any other tool to make it small. It f*cks the resolution of the psd. Go to Image>ImageSize

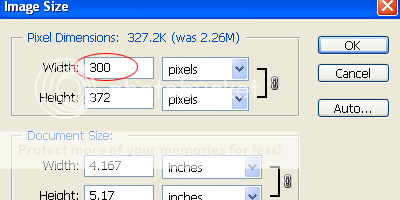
A window like the one above will pop up, decrease the pixels of the width and make it around 300 or 250. Once you adjust the width; the height will be adjusted itself. If you make the picture too small then use the history area to go back to the original picture, move the pictures to your Match Preview.

You will have something like this, now grab the Rectangular Marquee tool; don't make a selection yet.

Press CTRL+SHFT+N or simply make a new layer and make a selection using the Marquee tool.

Fill the selection with black and click somewhere else to de-select. Now you have a little name plate for yourself but to make it look even better, we will reduce the opacity of this layer.
Select opacity on the Layers Palette and reduce it to around 60% or something, depends upon you. When you are satisfied you have a basic Match Preview you can now make any adjustments, brightness or something. You can add more brushes to give a good effect, add text/ logo's whatever!

In the end, you will have something like this:


It looks pretty good for someone who just started with Photoshop so there it is! Hope you really learned something from this basic tutorial, in some weeks I'll post an advanced tutorial for people! Enjoy!
And once again, this tutorial is for n00bs - people who are totally new to Adobe Photoshop.
To make Match Previews for your BTB's or to make simple banners for anything, you can use these 5 steps to make something good. :boxed2: You can even check out my Advanced Tutorial which will be posted sometime soon, it shows how to make Match Previews the pro way! Alright, let's start with our short and easy tutorial.
CHECKLIST:
1) Adobe Photoshop CS3/CS2 Recommended
2) Wrestler PSDS - Download from http://www.Italianpsd.net or http://www.psdprotocol.com
3) Good fonts - Download from www.1001freefonts.com
4) Good Brushes - Google "Photoshop *Version* Brushes Download"
5) A good creative mind, and Rep/ Thank you for C4 :shifty:
Ok, let's start with our tutorial. Open up Photoshop; I use Photoshop CS3 and it's the best version in my opinion although any will work above PS 7.
Now go to File > New and select the settings you want, C4's recommended size for a Match Preview is 400*200 pixels.


Once you have selected your desired settings, click OK. Select the brush tool and go to File>Load>LoadBrushes and select your brushes, the one's which you have downloaded. (PM if you need help with brushes) then make a simple background.

Open up the ".psd/.png" Wrestler picture which you downloaded earlier. I have a Folder in 'My Documents' with the name of "PSD's" where I save all of the pictures that I download.
Have something like that. Once you select your picture click OK. I selected Finlay and MVP for my Match Preview.

Too bigg huh?? Don't use 'Free Transform' or any other tool to make it small. It f*cks the resolution of the psd. Go to Image>ImageSize

A window like the one above will pop up, decrease the pixels of the width and make it around 300 or 250. Once you adjust the width; the height will be adjusted itself. If you make the picture too small then use the history area to go back to the original picture, move the pictures to your Match Preview.

You will have something like this, now grab the Rectangular Marquee tool; don't make a selection yet.

Press CTRL+SHFT+N or simply make a new layer and make a selection using the Marquee tool.

Fill the selection with black and click somewhere else to de-select. Now you have a little name plate for yourself but to make it look even better, we will reduce the opacity of this layer.
Select opacity on the Layers Palette and reduce it to around 60% or something, depends upon you. When you are satisfied you have a basic Match Preview you can now make any adjustments, brightness or something. You can add more brushes to give a good effect, add text/ logo's whatever!

In the end, you will have something like this:


It looks pretty good for someone who just started with Photoshop so there it is! Hope you really learned something from this basic tutorial, in some weeks I'll post an advanced tutorial for people! Enjoy!
And once again, this tutorial is for n00bs - people who are totally new to Adobe Photoshop.


