


As there are alot of people who are not that good with photoshop, I found this old tutorial I made for another site, so I may aswell share it here, as it will help some of you.
This is basically a tutorial which will guide you on how to make si ple but effective signatures. Dont worry, its not hard.
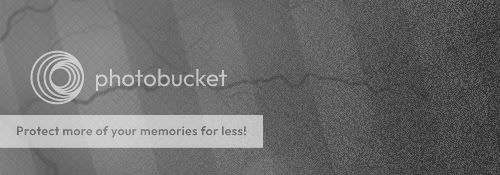
1. Make a new document, around 500x175. Fill it with a colour of your choice. For your first time, I suggest following the tutorial. I made mine a nice grey.
I then went to Filer > Noise > Add Noise. You choose the ammount of noise you think looks good, i cant remember what I used exactly, but dont use too much as it looks silly. I think i used around 4.
You dont have to do this, but I then used a lightning brush and brushed on the side to add some sort of effect. I also added some diagonal bars by using the line and fill tool.
If you do what I did, you should have something like this:
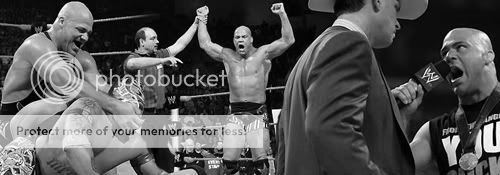
2. Now you want to find 3 pictures of the superstar/person/topic you want to make a signature of. I went onto WWE.com, and pick 3 images from Kurt angles profile.
I then resized the images so that their height was around 180px. I then Went to Image > Adjustements > Desaturate (CTRL + U) so that the images are now black and white. I then copy and pasted each image onto the Grey background already made. The first pasted one move to the left, the 2nd to the right, and then the 3rd to the middle.
Hopefully, you should have something roughley like this:

3. Then make sure that on the layer pannel you are on the middle image. Go to Layer > Add Layer Mask > Hide All. Then using the paint brush tool, paint the middle image so that it shows up but fits in with teh other images. As if they were all as one.
It should look like this:
4. Now merge the 3 image layers together by selecting the top layer (the middle picture) and pressing CTRL+E. This then blends the curent layer with the one below it. Press CTRL+E so that all 3 images are now as one layer. Then go to layer > blending options. Then adjust the opactiy of the images to what you think looks nice, I cant remember what I used, off the top of my head I'm guessing at around 75%.

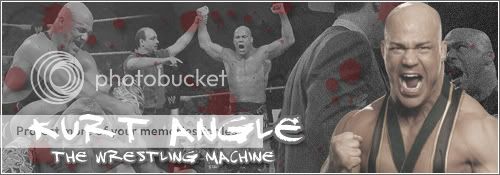
5. Now to make the signature abit more intresting, make a new layer (CTRL+SHIT+N) and then use a blood brush and briefly add some blood splatters to your work. (If you dont have blood brushes, you can find some on google by simply typing in "blood brushes for photoshop".) Then adjust the opacity of this layer (Layer > blending options) to what looks nice.
You should have something roughley like this:

6. Now open up a PSD of the person, this will be your main image. Re-size it so it looks reasonable and add it to your sig. Press CTRL+J to duplicate the layer, then press CTRL+SHIFT+U to desaturate the image. go to Blending options again and lower this layers opacity slightly so it looks kind of cool.
Then simply add some text. I have used the font "DJ Gross" in white, then added a Stroke of grey, of about 3px i think, then added a drop shadow afterwards.
You should have something like this:

7. Then make a new layer, Press CTRL+A to select all, and go to Edit > stroke. add a 3px white stroke. Then press CTRL+A again, follwed by anotehr stroke. This time make it a 1px black stroke.
Then you should have finnished product slightly like this:
Its not fantasticly amazing, but its a simple tutorial on how to start making sigs. If it makes you guys feel any better, here is my first sig on photoshop after trying to re-create signatures other people could do.
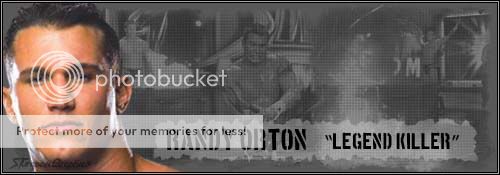
Lol!!!
Other exmaples of sigs using this technique are:
http://i41.photobucket.com/albums/e277/joeypoey007/AngleSig.jpg
http://i41.photobucket.com/albums/e277/joeypoey007/angle.jpg
There are others somewhere, but i cant find them atm, lol.
Anyway, i hope this helps some people, lol!
This is basically a tutorial which will guide you on how to make si ple but effective signatures. Dont worry, its not hard.
1. Make a new document, around 500x175. Fill it with a colour of your choice. For your first time, I suggest following the tutorial. I made mine a nice grey.
I then went to Filer > Noise > Add Noise. You choose the ammount of noise you think looks good, i cant remember what I used exactly, but dont use too much as it looks silly. I think i used around 4.
You dont have to do this, but I then used a lightning brush and brushed on the side to add some sort of effect. I also added some diagonal bars by using the line and fill tool.
If you do what I did, you should have something like this:
2. Now you want to find 3 pictures of the superstar/person/topic you want to make a signature of. I went onto WWE.com, and pick 3 images from Kurt angles profile.
I then resized the images so that their height was around 180px. I then Went to Image > Adjustements > Desaturate (CTRL + U) so that the images are now black and white. I then copy and pasted each image onto the Grey background already made. The first pasted one move to the left, the 2nd to the right, and then the 3rd to the middle.
Hopefully, you should have something roughley like this:
3. Then make sure that on the layer pannel you are on the middle image. Go to Layer > Add Layer Mask > Hide All. Then using the paint brush tool, paint the middle image so that it shows up but fits in with teh other images. As if they were all as one.
It should look like this:
4. Now merge the 3 image layers together by selecting the top layer (the middle picture) and pressing CTRL+E. This then blends the curent layer with the one below it. Press CTRL+E so that all 3 images are now as one layer. Then go to layer > blending options. Then adjust the opactiy of the images to what you think looks nice, I cant remember what I used, off the top of my head I'm guessing at around 75%.
5. Now to make the signature abit more intresting, make a new layer (CTRL+SHIT+N) and then use a blood brush and briefly add some blood splatters to your work. (If you dont have blood brushes, you can find some on google by simply typing in "blood brushes for photoshop".) Then adjust the opacity of this layer (Layer > blending options) to what looks nice.
You should have something roughley like this:
6. Now open up a PSD of the person, this will be your main image. Re-size it so it looks reasonable and add it to your sig. Press CTRL+J to duplicate the layer, then press CTRL+SHIFT+U to desaturate the image. go to Blending options again and lower this layers opacity slightly so it looks kind of cool.
Then simply add some text. I have used the font "DJ Gross" in white, then added a Stroke of grey, of about 3px i think, then added a drop shadow afterwards.
You should have something like this:
7. Then make a new layer, Press CTRL+A to select all, and go to Edit > stroke. add a 3px white stroke. Then press CTRL+A again, follwed by anotehr stroke. This time make it a 1px black stroke.
Then you should have finnished product slightly like this:
Its not fantasticly amazing, but its a simple tutorial on how to start making sigs. If it makes you guys feel any better, here is my first sig on photoshop after trying to re-create signatures other people could do.
Lol!!!
Other exmaples of sigs using this technique are:
http://i41.photobucket.com/albums/e277/joeypoey007/AngleSig.jpg
http://i41.photobucket.com/albums/e277/joeypoey007/angle.jpg
There are others somewhere, but i cant find them atm, lol.
Anyway, i hope this helps some people, lol!

")